Thursday, January 19, 2012

Roasted Butternut Squash Risotto

(This post brought to you by Jen)

The first thing Marc ever cooked for me was risotto with wild mushrooms, asparagus, and goat cheese.  Actually, it was for a group of young teachers in our first year of teaching.  I remember he put us to work.  I was put on risotto stirring duty.  He kept telling me, "Stir in figure 8s and don't stop."  I stirred so much and I kept a constant figure 8 pattern that I don't think I could feel my arm for days afterwards (it was a BIG POT).  It is only fitting that the first thing Marc taught me how to cook was risotto (not the one below).  I will now share my favorite side dish with you.

Hardware Needed:
2 medium size sauce pans**
1 (well loved) wooden spoon
1 ladle
9x13 casserole dish

**I use one sauce pan and one saucier.  If you don't have a saucier - you need to get one!  If you don't know what it is, Google it!!!**

Ingredients Needed:
2 tbsp plus 1 tsp olive oil
1 tbsp butter
2 cups butternut squash (diced into 1/4 to 1/2 inch cubes)
1 shallot, diced small
2 cloves garlic, diced small
2 cups arborio rice
4 (plus) cups chicken (or vegetable) stock
4 chives, diced
Zest of 1 lemon
Salt and Pepper to taste

Preheat oven to 350 degrees. 

Toss the butternut squash with 1 tsp. olive oil and season with salt and pepper in the casserole dish.  Roast in the oven for approximately 30 minutes until tender.  (I suggest doing this ahead of time unless you are an amazing multi-tasker in the kitchen.)  Remove from oven and set aside.  (NOTE:  I roasted a whole butternut squash and only used a small amount for this recipe.  I plan on using the rest in a soup, or eating as is - it's good either way!)


In one saucepan, over medium heat, warm the stock.  You do not want the stock to boil, just keep warm. 

(If you have never made risotto before or if you haven't yet learned it's trickiness, I suggest at this point - don't leave the kitchen or stray from the pan!!!)

In the other sauce pan (this is where I use my saucier instead), place 1 tbsp butter with 2 tsbp oil over medium high heat.  When the butter has melted, add shallot and garlic, cook until translucent - about 2-3 minutes. 

At this point, add arborio rice so that it can toast, stirring frequently about 2-3 minutes.  This is not adding color to the rice, it adds a nutty flavor that complements your finished product.  If you look at the picture below, you should be able to see there is some color variation in the grain.  Some looks white, while some looks like it has absorbed moisture.


From here, add in several ladles of stock until the rice is covered.  Season with salt and pepper.  Stir, stir and don't stop stirring.  (I admit, Marc goated me into believing that it had to be figure 8s.  Hook, line and sinker.  Just stir the pot and make sure to scrape down the sides/bottom so that nothing sticks.)


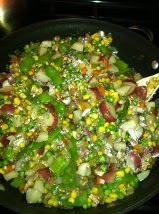
When it starts looking like the liquid has been mostly absorbed (below), add a few more ladles. 


Continue this process about 25-30 minutes until desired tenderness of the rice has been reached.  Some chefs say that the perfect risotto takes 22 minutes - start to finish.  I think I am a little slower than a professional, so mine takes me about 25-27.  (The first time I ever made it completely on my own, it took me about 45 minutes!  But then again, I used a lower heat so I didn't mess anything up.)  I start tasting around the 20 minute mark for seasoning levels and doneness. 

Once it has reached its desired tenderness, gently fold in squash, chive and lemon zest.  This risotto alone can be a full meal, but I placed about 1/2 cup on my plate with some pan-seared scallops for my dinner and garnished with some more chive.


Enjoy!

Notes:

The risotto recipe above will be called my "Basic Risotto".  I chose butternut squash because it looked too good to turn down.  The Basic Risotto recipe can be modified for anyone's taste in vegetable.  You may see some recipes add a tbsp of butter at the end to "give the risotto a shine" (I don't do this)  or parmesan cheese. 

I included some variations below.  All variations get added at the completion of the Basic Risotto.

-Ham and pea (Dice ham and gently cook frozen peas in the stock.  Half of the peas get pureed in a blender with some stock and seasoning.)

-Asparagus and goat cheese (gently cook the asparagus in the stock)

-Wild mushroom and brie (saute mushrooms with thyme and garlic ahead of time)

-Broccoli cheddar (gently cook broccoli in the stock)

-Asparagus, portobello, parmesan (cook asparagus in stock, saute portobello in a small pan)

Let your imagination run wild!  Choose fresh, local vegetables that are in season!

When adding vegetables to the stock to cook, they impart some of their flavor into the stock - it completely adds another dimension to your dish!  When they are done cooking, remove from the stock and set aside in a bowl.  (This tip right here is one of my secrets - you now have wisdom as to why my food is soooooooooo good.  Keep it close to your heart!)

Please leave a comment if you have any questions or suggestions for variations!

Wednesday, January 18, 2012

The Cuban

(This post brought to you by Jen)

The Cuban  (sigh) a Top 5 Sandwich in our book.  It's made up of some of the most simple ingredients (some which are pantry items, some may be leftovers), yet it hits every part of your pallette for complete enjoyment.

Hardware Needed:

Aluminum Foil
Sheet Pan
Cast Iron Grill Pan (A heavy oven proof skillet will do as well.)

Ingredients:

Crusty Bread (I used a ciabata roll, cut into a 4 inch square)
Dijon Mustard
3 Slices Swiss Cheese
2-3 Slices Ham
Pork Tenderloin, sliced thin on the bias (I used some leftover from a dinner a few days ago)
Sweet Pickle Sandwich Slices


Instructions:

Preheat oven to 400 degrees, with the sheet pan on the lower rack and the grill pan on the top rack.  These need to heat up with the oven.


Spread an even layer of mustard on both sides of the bread and one slice of cheese on each side of the bread.  From there, layer on the pork, pickles, last slice of cheese, and ham.  Close the sandwich up and wrap tightly in foil.  (I used a double layer so there was no leaking.)


Place the wrapped sandwich on the sheet pan and place the grill pan on top - I give it a little press so that it stays under the grill pan.  After 7 minutes, I flip the sandwich and let it go for another 7 minutes. 


Remove from the oven, unwrap, cut and serve.  The weight of the pan on top compresses the sandwich and helps create a nice crunch on the outside of your sandwich.

Your mouth will thank you for this sandwich. 

Enjoy!

Monday, January 16, 2012

Chicken Pot Pie - A "Pantry Dish"

I've been hearing from some of my friends that it's been a while since the last blog post.  I would say that May - January is quite a while!  Last night's dinner is brought to you by my wife, Jen.

Chicken Pot Pie is a traditional pantry dish, where many of the goods used come from items many people have on hand.  I've been practicing my skills for a while now, and I am perfectly happy being a  pantry cook.  Besides, I think most at-home cooks are pantry cooks anyway.

Jen's Tip #1:  I find that it is easiest to get all of your ingredients prepped before assembling because this dish comes together fast once you start cooking.  I've become very good at prepping because that's what I do for Marc when he cooks.  But at the same time, that's when I become his sous chef.

Jen's Tip #2:  I choose to not make this dish in individual crocks because there is less to clean if there is only one dish!  And how many people actually like cleaning up afterwards?  But if you are a fan of cleaning, use as many dishes as you like!

Jen's Tip #3:  When you cook, please keep seasoning and tasting in the forefront of your mind - the reason most restaurants have food that tastes so good is because they season their food and give it time for flavors to develop.  I think this is the most important thing Marc taught me about cooking - season your food!  Yes, my husband taught me how to cook and because of his teachings, I now can make Grandma's Sunday Sauce like a pro (but not as good as Grandma's - it just never is...)

Preheat oven to 375 degrees.

Hardware Needed:

Large Skillet (I use a 15 inch Calphalon)
Casserole Dish (9 x 13 minimum)
Foil covered sheet pan (just in case of spill over)

Ingredients:

1 lb. chicken sausage, casings removed (mild or hot)
2 medium onions, diced
3 cloves garlic, chopped fine
2 stalks celery, diced
2 carrots, diced
1 lb. red potatoes, diced into 1/2 inch cubes and parboiled in salted water
2 cups baby bella mushrooms, quartered
1 tsp. thyme
1 tsp. Italian seasoning
Red pepper flake (to your desired spice level)
1/2 lb. each - frozen peas, corn, green beans
1/4-1/2 cup AP flour
4-5 cups chicken stock (homemade preferable)
1 rotisserie chicken, shredded or chopped
2 prepared pie crusts
1 egg plus 1 tbsp. water, beaten
Salt and pepper to taste

In a large skillet, brown chicken sausage over medium high heat. 
Remove to a bowl and set aside.

In the same skillet, there may be some remaining drippings.  Do not drain (it's flavor!).  If your chicken sausage was lean, you may add some oil to the pan.  Sweat the onion, garlic, celery, and carrot (seasoned with salt and pepper) over medium heat, approximately 5-7 minutes. 

Add potatoes, mushrooms, thyme, Italian seasoning and red pepper flake.  When the ingredients have warmed through, add in peas, corn and green beans.  Season again with salt and pepper.  Taste to make sure the seasoning levels are appropriate.


Once all the ingredients are thoroughly mixed, dust evenly with flour.  (If you like the gravy of your pot pie a little thicker, use closer to 1/2 cup.)  Cook the flour with the vegetables approximately 3 minutes and add chicken stock.  Bring to a boil.  You may want to season with salt and pepper again.  Believe it or not, many food items don't come pre-seasoned!


Stir in chicken sausage and diced rotisserie chicken until coated in gravy.  Pour into casserole dish. 

Cover with the prepared pie crust and brush on egg wash.  Most prepared pie crusts come in round shapes, I shape mine to fit the casserole dish.  Place the casserole onto the foil covered baking sheet and place in the oven for 25-30 minutes so that the pie crust turns golden brown.

Let rest for 10 minutes so that the gravy can firm up and spoon into bowls.  For additional heat, drizzle with hot sauce.


This dish is packed with vegetables and stick to your ribs goodness that will please even the pickiest of eaters.  And guess what, if you don't like one of the vegetables, you can always substitute in another or double up on something else.

From start to finish, this dish took approximately 1 1/2 hours.  That may seem like a lot of time, but considering prepping the ingredients took about half that time (I do include browning the sausage and parboiling potatoes as prep), I really only spent about 20 minutes at the stove and 30 minutes cleaning up while the pie was in the oven (Why sit and do nothing while it's in the oven?  Clean up a little!)

This dish is packed with vegetables and stick to your ribs goodness that will please even the pickiest of eaters.  And guess what, if you don't like one of the vegetables, you can always substitute in another or double up on something else.

Trust me, you will be well rewarded taking your time on this dish!  Enjoy this hearty pantry favorite!

~Jen